WooCommerce is the most popular WordPress Plugin and is quite simple to install. Users can easily customize it as per their needs. The plugin has many free and paid products too. The primary objective of WooCommerce is to help online sellers (whether a new startup or an established one) use WordPress to sell their products. It is an open-source plugin for WordPress.
This article will discuss the installation requirements, configuration steps of WooCommerce, and how to set up an online store with this plugin.
Installation Requirements for WooCommerce Plugin
Here, we will look at some of the important features of WooCommerce, and learn about the system requirements and installation process of the WooCommerce plugin on the business plan account (premium account) of WordPress.

Requirements of Server
Before installing the WooCommerce plugin it’s important that the sellers check the server’s needs so that the installation process could take place without any hindrance. So, here are the following recommendations to install WooCommerce:
- The PHP software on the server should be of the latest version. A decent 7.2 or higher, is recommended.
- The latest version of MySQL is 5.7.32 (released in Oct 2020). However, version 5.6 can work decently.
- Another alternative to MySQL would be MariaDB (version 10.0 or higher). The latest updated versions of MariaDB are 10.5.8, 10.4.17, 10.3.27, and 10.2.36.
- Other alternatives to MySQL are IBM Db2, SQLite, PostgreSQL.
- The memory limit of WordPress should be 128 MB or more.
- Sellers’ servers would need HTTPS support.
Note: A PHP version would not work, if it is less than 7.2 + or so, and the MySQL version is lesser than 5.6. If you are using the outdated versions, then you will not receive immediate support, as most of those versions have run their course and are not maintained very well anymore. And it may lead to too many security issues for your website in the future. It is crucial to make sure to use the updated versions of PHP and MySQL.
How to Install WooCommerce Plugin
WordPress’s business plan account is the paid version of WordPress. It contains important features like a vast storage space (200 GB), live chat support (to speak to customers), SEO tools and services, and access to a database of MySql and SFTP (Secure File Transfer Protocol) amongst other features. Let’s learn to install WooCommerce on the WordPress business plan account in a step-by-step process.
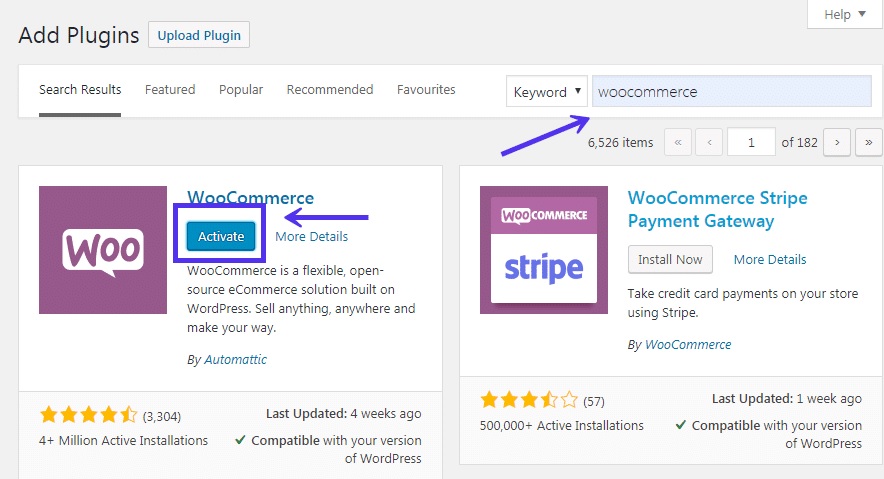
- Log in to the WordPress business plan account. Go to the Tools and open the drop-down menu.
- On the left-hand side menu, click the plugin.
- The seller would find a page with several plugins to download. Most of them are free and also have premium versions available.
- Click on WooCommerce activate/ Install button. And there you go! Within a few seconds, the plugin successfully installs on the seller’s WordPress site.
Set Up An Online Store on WordPress With WooCommerce
Once the installation process of the WooCommerce Plugin is complete, sellers are directed to WooCommerce’s setup Wizard. Let us have a quick look at the steps to understand how sellers can set up their stores on WordPress.

The following steps to set up online stores on WordPress are:
1. Sellers must provide location details of their stores on Store Profiler. After the completion of each step, sellers will be redirected toward the next step.
2. To make WooCommerce better, once the location details are filled in, click continue, and a dialogue box would pop up, and it will ask sellers to participate. Tick on “Yes, count me in” and click continue.
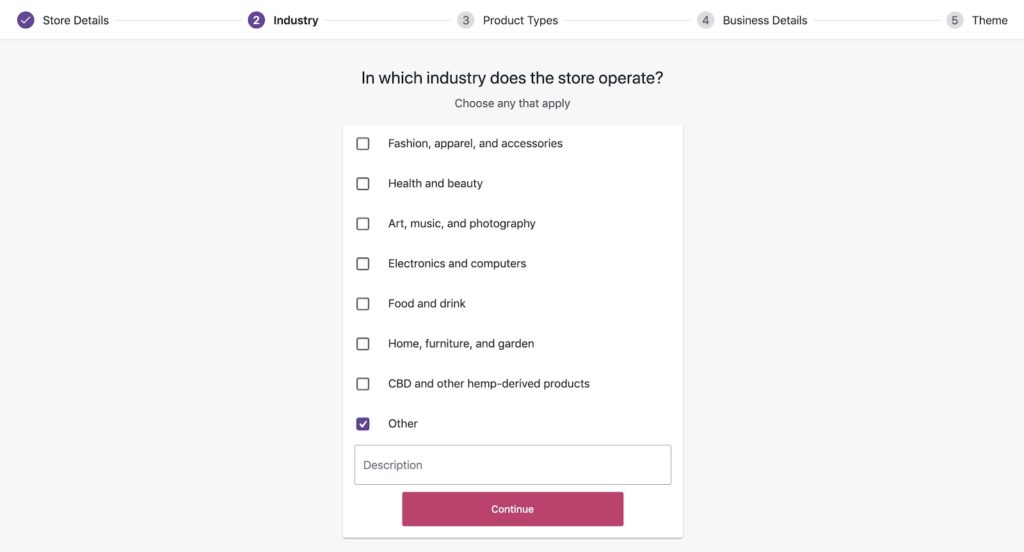
3. WooCommerce would pose questions like which industry your store is related to and provide sellers with some default options, like Fashion or apparel, Health and beauty, Art and music, food and drink, and more. It will help sellers’ e-commerce sites to be optimized.
4. Next, this seller-friendly plugin will ask about the type of products one wishes to sell to the customers. It gives choices like how one wishes to sell his products, whether it is a product that needs to be delivered or an Ebook or any other document that needs membership and subscription payment methods.
5. Sellers can customize the websites by the customization option and provide more details about their products and overall business. For Example: How many products does a seller plan to display? Currently, selling elsewhere? These are some of the questions that can help to make a seller’s website better.
6. Companies also get the brilliant options to use other marketing tools with WooCommerce activated WordPress e-commerce site. They can use tools like Facebook, Mailchimp, and Good Ads accordingly.
7. If one wishes to discontinue the services, extensions, or plugins in the future, he gets the opportunity to do it.
8. Once all the questions are answered correctly at the store profiler, sellers are redirected towards choosing the website’s theme. Sellers can select many predefined themes (Free or Paid ones) that can best describe products and make their website look more meaningful and attractive.
9. Install the Jetpack plugin and WooCommerce shipping and Tax Plugin if sellers wish to collect taxes (automated) and print labels for shipping.
10. Once a seller chooses a suitable theme for their website, the next step is to complete the remaining store profiler questions. For example: Add my products, set up payments, set up Tax, personalize my store, Setup Wizard, Setup shipping are the details you are.
11. A seller can also go back and fill in any information about his store, in case the step is skipped mistakenly.
12. A store setup checklist is an essential step for the store. Sellers can add their products, decide their pricing, quantity, and how they wish to receive the payments are all decided in the checklist.
13. After a seller submits the store profiler, the store management widget will appear to manage his website. It will carry important links to manage his online shop, for example, market my store, add Products, personalize my store, shipping settings, tax setting, payment setting, edit store details, get support, and view my store are some of the features that can make a seller’s store more up to date and customer as well as seller-friendly.
Reusing The Setup Wizard
This wizard can help sellers to use the profile setup wizard again so that if a seller wishes to add or remove any specific feature from his website at any given point in the future, he can do it without any hindrance.
Conclusion
WooCommerce plugin is a crucial part of WordPress. It can help the online sellers to have a professional site just like any high-end e-commerce website. This article discussed the easy installation of the WooCommerce plugin and the recommended system requirements like the latest versions of PHP, Maria DB, and MySQL. Sellers can create user-friendly features, and customize themes to make them suitable for the e-commerce website. Moreover, WooCommerce’s SEO option can bring sellers’ websites to the top of search results. The plugin has several other significant features that make it robust and dynamic in nature. This plugin makes in-depth analysis according to the provided store profiler answers which it collects in a step-by-step process from the seller. WooCommerce plugin is that it can work with Google Analytics also.
An efficient CRO team can guide you to install suitable plugins and avail of the unique features of WooCommerce, making your website a professional, customer, and seller-friendly platform.


